You are using an out of date browser. It may not display this or other websites correctly.
You should upgrade or use an alternative browser.
You should upgrade or use an alternative browser.
260kmh speedo
- Thread starter bradc
- Start date
leebutts
1 AYC Bar
Is the 260km from an NZ new car?
cheers
Lee
cheers
Lee
bradc
1 AYC Bar
- Thread starter
- #3
it is from an NZ New V6 fwd automatic Galant.
http://www.trademe.co.nz/Trade-Me-Motors/Cars/Mitsubishi/auction-105788722/k-47742.htm
http://www.trademe.co.nz/Trade-Me-Motors/Cars/Mitsubishi/auction-110722038/k-47742.htm
http://www.trademe.co.nz/Browse/Listing.aspx?id=111604025&key=47742
I used the chassis number of one of those cars to order the dash")
http://www.trademe.co.nz/Trade-Me-Motors/Cars/Mitsubishi/auction-105788722/k-47742.htm
http://www.trademe.co.nz/Trade-Me-Motors/Cars/Mitsubishi/auction-110722038/k-47742.htm
http://www.trademe.co.nz/Browse/Listing.aspx?id=111604025&key=47742
I used the chassis number of one of those cars to order the dash
leebutts
1 AYC Bar
Good work! Look forward to seeing how it turns out.
cheers
Lee
cheers
Lee
SiliconAngel
1 AYC Bar
Excuse the probably silly sounding question, but will the new speedo be accurate? I assume its a standard pin-turned mechanism, not a digital readout from a computer? Is it calibrated to work with the speed of the turning mechanism coming into it?
Also, have you thought of getting a whole new sticker made up for your finished hybrid? That way you can cut and join it however you like, peel the existing (battered) stickers off and replace it with a lovely new one with no join lines. There should be plenty of graphic design places in any major city that could point you in the right direction to get something like that done... In fact, trounced has said he can get stickers made, so he might be able to help you out?
Also, have you thought of getting a whole new sticker made up for your finished hybrid? That way you can cut and join it however you like, peel the existing (battered) stickers off and replace it with a lovely new one with no join lines. There should be plenty of graphic design places in any major city that could point you in the right direction to get something like that done... In fact, trounced has said he can get stickers made, so he might be able to help you out?
G
Guest
Unregistered
its a digital signal, and can be tuned/modified using a jaycar kit
CAT. NO. KC5435

CAT. NO. KC5435
jaycar said:Speedo Corrector MkII Kit
When you modify your gearbox, diff ratio or change to a large circumference tyre, it may result in an inaccurate speedometer. This kit alters the speedometer signal up or down from 0% to 99% of the original signal. With this improved model, the input setup selection can be automatically selected and it also features an LED indicator to show when the input signal is being received. Kit supplied with PCB with overlay and all electronic components.
G
Guest
Unregistered
oh and what do you mean by stickers?
the high vis dash is black/matt plastic one piece with lightend areas for the light to come thru.
ive seen printed/el dash kits, but only for the non high-vis dash.
here we go......
http://broomfish.co.nz/product_info.php?cPath=22_42_105&products_id=77
the high vis dash is black/matt plastic one piece with lightend areas for the light to come thru.
ive seen printed/el dash kits, but only for the non high-vis dash.
here we go......
http://broomfish.co.nz/product_info.php?cPath=22_42_105&products_id=77
G
Guest
Unregistered
so have you done it yet?? you've had them for at least 2 days now??
speaking of being slack?? have even fitted the grenador mirrors yet?
speaking of being slack?? have even fitted the grenador mirrors yet?
bradc
1 AYC Bar
- Thread starter
- #14
haha no, remember that I leave home when it is dark and get home when it is dark. Today I changed the oil in the white VR-4 and got half way through cleaning it when Matt, Tara and Bailey turned up. Bailey pointed out that too much chocolate can make you sick, like what happened to me and 'your big loud friend' at my party. LOL
They left about 50 minutes ago (hence me coming online here and at cvr4) I'm going to finish up cleaning the white one tomorrow and maybe, just maybe get around to the speedo.
They left about 50 minutes ago (hence me coming online here and at cvr4) I'm going to finish up cleaning the white one tomorrow and maybe, just maybe get around to the speedo.
SiliconAngel
1 AYC Bar
Even if Brad doesn't need it, that's good to know, thanks Gly!its a digital signal, and can be tuned/modified using a jaycar kit
CAT. NO. KC5435
Hmm didn't realise that... Maybe you could just template it, sand it back and repaint it? Or just stick a sticker over the top? That does look like a nasty, nasty job! >.< Good luck Brad, I can't wait to see how it turns out!!oh and what do you mean by stickers?
the high vis dash is black/matt plastic one piece with lightened areas for the light to come thru.
To be honest, those look freaken ugly...
G
Guest
Unregistered
ive seen a custom 260km speedo for the vr4, it was on the clubvr4 forums,
was a cut/paste job like brads will be... once the plastic cover is over the guages you cant see the joins (if done well) as theres a slight tint to the plastic cover over the guages. it hides the join nicely...
brad may have the picture? or know where it is?....
brad, did you and mike swap over the interiors ok??
changed my oil and filter and fitted the sandwich plate, and wired up my oil pressure guage today,
yah it works LOL! still need to grab a couple of cups from you to make the guage clock pod if you still want/need it??
SiliconAngel
1 AYC Bar
Yea I'd like to see that...brad may have the picture? or know where it is?....
SiliconAngel
1 AYC Bar
Yea you can... Hmm maybe if you masked up all the dials and hit the joins with a couple of coats of black spray paint you wouldn't notice it behind the console plastic? Maybe spray the back as well, to limit light bleeding through from in-dash LEDs. Haha I'm sure you've already thought of all this, so I'll just shutup now! >.<
bradc
1 AYC Bar
- Thread starter
- #20
Update - it has been working fine for two years now!
First of all you need to buy a new speedo cluster. The one I purchased is MR506170 and is from an NZ new V6 Galant sedan. These are available in about 3-4 weeks from Ralliart NZ (ask for Bill) and cost $575.
At some point you will need to reference this excellent article by Kieran http://www.clubvr4.com/forum/showthread.php?t=2629. There are 3 screws to undo beneath the steering column as Kalle points out. Removal of the dash itself is easy, there are 4 screws to remove and you just need to undo them, then pull on the dash to get it out.
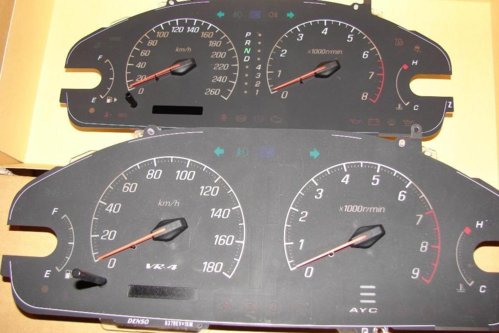
Here is a picture of what it looked like compared to a normal VR-4 dash.

Obviously my VR-4 is a manual and VR-4's have a redline at 7000rpm with markings all the way up to 9000rpm. Because of this the pieces of plastic on top need to be cut very very carefully so you can get the parts across that you want.


I cut mine so I had the manual centre section, if you have an auto VR-4 then you will obviously have to cut it in a different section so that you get all 5 gear selection indicators. To get the plastic off all you need to do is gently pull the 4 needles off with your fingers.
The next thing you need to do is to break the clear plastic section which sits behind the printed plastic with the markings on it. This is because the numbers are printed onto the plastic so the light shines through in the correct places. Obviously the 260kmh + 8000rpm one I had wouldn't give me the correct increments for rpm.
The difficult part is getting the plastic out. To do this you have to remove all of the bulbs and all of the screws from the back, as well as the little transformer box, being careful to seperate the pins highlighted as shown.


There are 3 sorts of screws, and these have been marked in this picture.

The blue ones are the longest ones with a wood thread on part of them, then a section with no thread at all. The red ones are the same style, but shorter (be VERY careful with these two) the yellow ones are normal fine thread screws. Ignore the tick and the cross, I had some problems due to me putting in the wrong screws at first (blue into the red ones) Discussed later on.
To cut the plastic in half I literally sawed and bent mine until it snapped apart, fortunately where I wanted it to snap!

The little bit of electronics screwed into the plastic section is best left there, obviously they need to be moved across with their pieces of plastic so that your speedo and tach don't become inaccurate.
After this it is all very easy, just reassemble the dash and install it back into the car. Because I've used a complete dash with the electronics for the 260kmh section, my speedo is perfectly accurate! Also because I kept the 9000rpm tach from a VR-4 I still have the AYC bars, and AYC red warning light. All of the warning lights work perfectly fine.
Problems: When I installed it at first the speed and rpm needles did not light up. This was because one of the contacts wasn't making a perfect connection with the screw on the rpm needle because I had originally reassembled it with one of the longer screws. I needed to open the whole lot up again and bend the end of the screw slightly so it touched the contact. Also one of the indicator bulbs didn't work, I simply swapped in another bulb and it worked straight away.

First of all you need to buy a new speedo cluster. The one I purchased is MR506170 and is from an NZ new V6 Galant sedan. These are available in about 3-4 weeks from Ralliart NZ (ask for Bill) and cost $575.
At some point you will need to reference this excellent article by Kieran http://www.clubvr4.com/forum/showthread.php?t=2629. There are 3 screws to undo beneath the steering column as Kalle points out. Removal of the dash itself is easy, there are 4 screws to remove and you just need to undo them, then pull on the dash to get it out.
Here is a picture of what it looked like compared to a normal VR-4 dash.
Obviously my VR-4 is a manual and VR-4's have a redline at 7000rpm with markings all the way up to 9000rpm. Because of this the pieces of plastic on top need to be cut very very carefully so you can get the parts across that you want.
I cut mine so I had the manual centre section, if you have an auto VR-4 then you will obviously have to cut it in a different section so that you get all 5 gear selection indicators. To get the plastic off all you need to do is gently pull the 4 needles off with your fingers.
The next thing you need to do is to break the clear plastic section which sits behind the printed plastic with the markings on it. This is because the numbers are printed onto the plastic so the light shines through in the correct places. Obviously the 260kmh + 8000rpm one I had wouldn't give me the correct increments for rpm.
The difficult part is getting the plastic out. To do this you have to remove all of the bulbs and all of the screws from the back, as well as the little transformer box, being careful to seperate the pins highlighted as shown.
There are 3 sorts of screws, and these have been marked in this picture.
The blue ones are the longest ones with a wood thread on part of them, then a section with no thread at all. The red ones are the same style, but shorter (be VERY careful with these two) the yellow ones are normal fine thread screws. Ignore the tick and the cross, I had some problems due to me putting in the wrong screws at first (blue into the red ones) Discussed later on.
To cut the plastic in half I literally sawed and bent mine until it snapped apart, fortunately where I wanted it to snap!
The little bit of electronics screwed into the plastic section is best left there, obviously they need to be moved across with their pieces of plastic so that your speedo and tach don't become inaccurate.
After this it is all very easy, just reassemble the dash and install it back into the car. Because I've used a complete dash with the electronics for the 260kmh section, my speedo is perfectly accurate! Also because I kept the 9000rpm tach from a VR-4 I still have the AYC bars, and AYC red warning light. All of the warning lights work perfectly fine.
Problems: When I installed it at first the speed and rpm needles did not light up. This was because one of the contacts wasn't making a perfect connection with the screw on the rpm needle because I had originally reassembled it with one of the longer screws. I needed to open the whole lot up again and bend the end of the screw slightly so it touched the contact. Also one of the indicator bulbs didn't work, I simply swapped in another bulb and it worked straight away.
Similar threads
- Replies
- 1
- Views
- 766
- Replies
- 13
- Views
- 547
- Replies
- 1
- Views
- 1K