Fuel pump not priming - car slow to start - why?

Baba Galant

1 AYC Bar
Lifetime Member
Location
Melbourne
First Name
John
Drive
Galant VR4 twin turbo 1997
Alot of aftermarket regs dont hold pressure, you're right. And that combined with an ecu that doesnt prime till cranking leads to a bit of time on the starter.

You could wire in a short timer relay to prime with Key "on" if it really botheres you.

Ive also found that the higher flowing aeromotive regs. Are unable to hold a steady pressure with low fuel pump flow. i.e: when the intank pump is running though the low speed resistor. So when putting in a aftermarket reg I always strip the resistor and speed relay out of the loom. No only does this eliminate the fuel pressure issue at low pump speeds but it tidys up the firewall and gives you a spot to mount your reg where the stepdown relay and resistor used to be.
I have only bypassed the resistor. Should I remove the 2 speed relay also?
Which connections would I bridge?
 

6A13TT TYPE S

3 AYC Bars
Lifetime Member
Location
New Zealand
First Name
Adam
Drive
1999 Legnum VR4 Type S
I have only bypassed the resistor. Should I remove the 2 speed relay also?
Which connections would I bridge?
You can eliminate the speed relay entirely by connecting the output of the main fuel pump relay in the cabin to the fuel pump power wire that fucks off down the side of the car.

Ive had the speed relay fail before. The car ran fine with 12v to the pump when idling (relay in low speed position) but the relay had a rusty contact so when the engine saw load and the ecu switched the relay to bypass the resistor the pump got no voltage. This was a real head scratcher to diagnose.

And As above if you just connect the main FP relay directly to the pump itself you can pull that big ugly relay and resistor out entirely.

I have a loom opened up on the bench at home. So ill take a photo of what relay it is and what to connect when i get home
 

BCX

Administrator
Moderator
Location
SA
First Name
Bill
Drive
2000 Galant Type-V
1997 MK Triton GLS [6G74 conversion]
2019 i30 N-Line
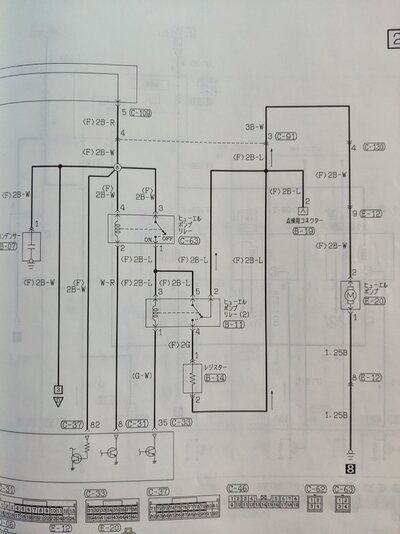
Here's a wiring diagram of the relay/resistor block and fuel pump. If you want to test, take the relay out and bridge pin 5 + 2, the pump will run at 12v all the time.

Connector that plugs into main fuel pump relay (C-63) is located near the ECU.
B-11 is the connector for the hi/low speed relay, located on the firewall with the resistor block (connector B-14)

The transition between low and high also causes a blip in fuel pressure, which corelates to blip in AFR, hence why it's better to delete (or if you want to bridge, not just bridge B-14 to eliminate the resistor block)

There's a couple of other parameters, but ECU switches over between low and high is at 80% load. (Essentially start of boost if you wanna look at it that way.)

Best to hardwire as @6A13TT TYPE S has mentioned. Get some firewall real estate back!

PXL_20210630_065940702.jpg
 

6A13TT TYPE S

3 AYC Bars
Lifetime Member
Location
New Zealand
First Name
Adam
Drive
1999 Legnum VR4 Type S
And while your at it delete the fuel pressure reg vaccum signal solenoid. As from my understanding that cuts vaccum signal to the stock FPR to comensate for the lower fuel pressure being delivered during the pump running through the resistor.
 

6A13TT TYPE S

3 AYC Bars
Lifetime Member
Location
New Zealand
First Name
Adam
Drive
1999 Legnum VR4 Type S
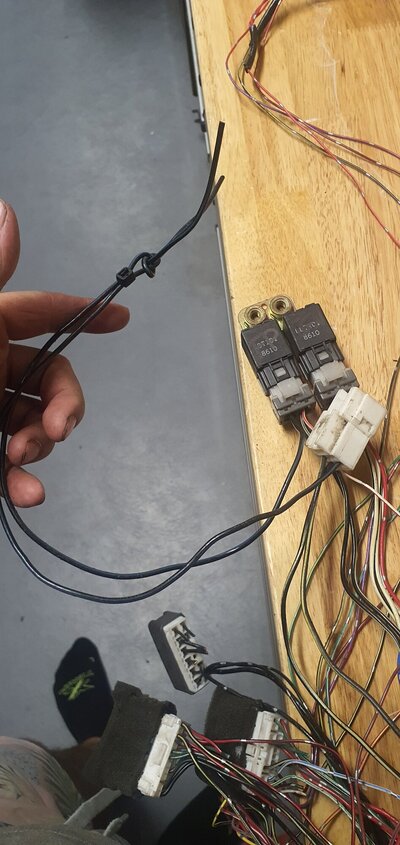
Behind the head unit is 2 relays. Left is your fuel pump relay. Right is the ignition relays.
Front left wire is the output of the relay which goes off to supply power to the resistor relay.
Black w' blue stripe

20220224_210009.jpg


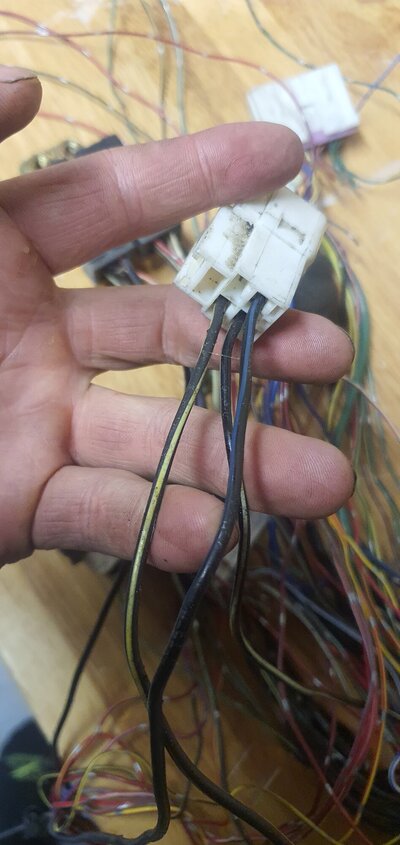
This 4 pin connector connects the engine loom to the body loom. Again Black w' blue stripe is the power that goes to the fuel pump itself.

Normally the main fuel pump relay output goes through the firewall up to the FP speed relay whicb either switches between the resistor or no resistor then it goes back through the firewall back to that 4 pin plug. I assume they did this purely as mounting the resistor under the dash is a fire hazzard.
But you can just connect the 2 together.

20220224_210035.jpg


20220224_210000.jpg
 

Baba Galant

1 AYC Bar
Lifetime Member
Location
Melbourne
First Name
John
Drive
Galant VR4 twin turbo 1997
Hey guys, thanks a bunch! I'll clean this all up tomorrow and get back to you

Many thanks!
 

Baba Galant

1 AYC Bar
Lifetime Member
Location
Melbourne
First Name
John
Drive
Galant VR4 twin turbo 1997
Behind the head unit is 2 relays. Left is your fuel pump relay. Right is the ignition relays.
Front left wire is the output of the relay which goes off to supply power to the resistor relay.
Black w' blue stripe


This 4 pin connector connects the engine loom to the body loom. Again Black w' blue stripe is the power that goes to the fuel pump itself.

Normally the main fuel pump relay output goes through the firewall up to the FP speed relay whicb either switches between the resistor or no resistor then it goes back through the firewall back to that 4 pin plug. I assume they did this purely as mounting the resistor under the dash is a fire hazzard.
But you can just connect the 2 together.


Thanks for going to the trouble of taking photo's, it's really appreciated! Looking forward to losing the relay and resistor!
 

6A13TT TYPE S

3 AYC Bars
Lifetime Member
Location
New Zealand
First Name
Adam
Drive
1999 Legnum VR4 Type S
Thanks for going to the trouble of taking photo's, it's really appreciated! Looking forward to losing the relay and resistor!
Not sure how easy it is to pull the wires out of the loom in situ. As ive cut this loom apart to rewire it for 6 coil and a link ecu but even just not needing that relay there gives you some space and can just tuck the wires out of the way
 

Baba Galant

1 AYC Bar
Lifetime Member
Location
Melbourne
First Name
John
Drive
Galant VR4 twin turbo 1997
Not sure how easy it is to pull the wires out of the loom in situ. As ive cut this loom apart to rewire it for 6 coil and a link ecu but even just not needing that relay there gives you some space and can just tuck the wires out of the way
Ok have access to the two relays just behind the head unit, anyone have a rough idea where the 3 way plug is hiding for the fuel pump relay?
 

Baba Galant

1 AYC Bar
Lifetime Member
Location
Melbourne
First Name
John
Drive
Galant VR4 twin turbo 1997
Right, found it was looking at the wrong side with diff colour's!
Worked a treat removed the resistor and 3 connectors from the firewall.
Thanks guys!!
 

Baba Galant

1 AYC Bar
Lifetime Member
Location
Melbourne
First Name
John
Drive
Galant VR4 twin turbo 1997
The 4 way was clipped onto another larger white connector directly below the head unit. Back of it had the right colours and positions as shown above. If nothing else it allow d me to piss of that 2 speed relay and crusty cables. Taking the passenger side trim centre console is a great help, easy to move those relays and plate around as one.
I'll wait for the car to cool down and see how it starts up, also bypassed the hot start/ vacuum solenoid to th FPR.
 

6A13TT TYPE S

3 AYC Bars
Lifetime Member
Location
New Zealand
First Name
Adam
Drive
1999 Legnum VR4 Type S
It wont start any easier as the ecu still doesnt prime on "key on" but its a redundant system completely removed so it cant cause any issues in future
 

Blackbandt

Hesitantly Boosting
Location
Germany
First Name
Alex
Drive
Legnum VR4 Typ S
Hi

I would also like to remove the resistor and speed relay. But I still have questions because I do not quite understand it yet

I would like to test this first. If I understand it correctly, I take out the relay on the firewall and bridge pin 5+2 right? Or do I have to remove the connector from the resistor and bridge pin 5+2 there so that the pump runs permanently with 12v ?

And if I want to remove the resistor and speed relay. Which cable do I have to connect to which? I do not quite understand

Thank you
 

Baba Galant

1 AYC Bar
Lifetime Member
Location
Melbourne
First Name
John
Drive
Galant VR4 twin turbo 1997
Ok, the relay in the above image and white connector are sitting just below the head unit/stereo.
Remove the facia from the t/bar surround and the centre facia from the cigarette lighter up to the vents.
In addition to this, remove the centre console panel side (LHS) to gain better access to the 2 small relays behind and below the head set.
The connector is roughly in the middle further forward. Use the diagrams above to place a link wire from the 4 wire relay to the 3 wire connector.
When this is done you should be able to remove the speed relay in the firewall and the vehicle will start and run at 12 volts always.
 

Legnum in America

Leaving Skid Marks
Premium Member
Location
Chicago
First Name
Mike
Drive
1997 Mitsubishi Legnum VR4 COTY
2022 Subaru Outback Onyx XT
1999 Honda Civic EX
Okay, firstly I wanna say I really appreciate all the info in this thread. It has prevented me from trying alot of things done here which were theories I had in mind too. So thats for that. I've had this slow start problem for about a year now and it's annoying, embarrassing and not to mention it cuts the lifespan of your starter. After going through this thread in depth I was left at the Maf and fuel pressure. My Maf checked out fine so that left me at fuel pressure...FPR checked out fine which lead me to the o'ring in the fuel pump assembly. Did a search for alternatives and found something on an eclipse forum... Needless to say...it worked! Seriously... Ditch the o'ring and spacer and get this part. Its a Toyota part... Part # 23239-21010. My car starts immediately now. So if u had this issue. U can try this. I've attached a pic comparing our o'ring and spacer and the seal from Toyota. Fits tight and snug. Put a little lube on it tho as it is very tight.


Going to try this, I am out of ideas.
 

Baba Galant

1 AYC Bar
Lifetime Member
Location
Melbourne
First Name
John
Drive
Galant VR4 twin turbo 1997
Going to try this, I am out of ideas.
While chasing a stumble and rough cold idle I decided to swap out the Tomei FPR to a turbosmart unit.
The Tomei holds no pressure after the pump is off, the turbosmart does. So, not all aftermarket fpr's hold pressure AND not all fuel pumps have a check valve built Into the output feed.
After a failed Walbro I switched back to a DW200 with a check valve, it wasn't working right so a few manual pushes on the pin and some throttle body body cleaner got it going.
On switch off I now have residual pressure though not long lasting.
It has totally sorted the hard starting issue even after falling to zero pressure.
I had noticed when installing new injectors that the fuel lines where practically dry 30 mins after starting up.
To add to this, not all fuel pumps are identical in length, feed height and end diameter.
This means I believe that we need to trial different O rings and spacers to maintain a proper seal to the fuel pump cradle.
I was using a 4 X 8 O ring previously and on swapping out fuel pumps found that it had distorted after a few months. The Internal diameter was no longer round when I removed the fuel pump.
Another issue is that the lower cushion or rubber supplied varies in height to accommodate different pumps. Mismatching these will effect the seating pressure at the output nozzle so care needs to be taken here too.
 

Legnum in America

Leaving Skid Marks
Premium Member
Location
Chicago
First Name
Mike
Drive
1997 Mitsubishi Legnum VR4 COTY
2022 Subaru Outback Onyx XT
1999 Honda Civic EX
Okay, firstly I wanna say I really appreciate all the info in this thread. It has prevented me from trying alot of things done here which were theories I had in mind too. So thats for that. I've had this slow start problem for about a year now and it's annoying, embarrassing and not to mention it cuts the lifespan of your starter. After going through this thread in depth I was left at the Maf and fuel pressure. My Maf checked out fine so that left me at fuel pressure...FPR checked out fine which lead me to the o'ring in the fuel pump assembly. Did a search for alternatives and found something on an eclipse forum... Needless to say...it worked! Seriously... Ditch the o'ring and spacer and get this part. Its a Toyota part... Part # 23239-21010. My car starts immediately now. So if u had this issue. U can try this. I've attached a pic comparing our o'ring and spacer and the seal from Toyota. Fits tight and snug. Put a little lube on it tho as it is very tight.


Did you use the white cap with the new gasket as well?
 

Baba Galant

1 AYC Bar
Lifetime Member
Location
Melbourne
First Name
John
Drive
Galant VR4 twin turbo 1997
Yes. I always use new O ring between the pump and pump cradle. I used the existing white cap as it snapped on tight to the Denso pump.
I place the top hat spacer with the flat facing up to provided better support for the lower O ring.
 
Last edited:
Top Bottom