Rusted/Seized wheel studs?

NSNO_RJB

No Idea what i'm doing
Premium Member
Location
Sydney
First Name
Ronan
Drive
1998 VR4 Galant
hey guys,

noticed on my PFL galant that 3 or 4 studs on different wheels are impossible to get the wheel nuts on,

tried wd40 overnight and 1 went on eventually but 3 are still being pains, any ideas apart from replacing the whole hub assembly?

was thinking wire brush it when the wheels are off but if it wont do anything i wont bother with all the work

thanks in advance
 

Gt_Galant

EC5A
Location
New South Wales
First Name
Fred
Drive
Galant
What are you using to take the nuts off ? Hopefully not a cheap crossbar or the original things that came with the car ?

Normally I'd use a long breaker bar, should do the trick in 3 seconds
 

Size1

Leaving Skid Marks
Location
N.S.W
First Name
Simon
Drive
00 legnum vr4
Sorry just to clarify is the problem taking the nuts off or putting them on?
If the threads are rusty soak in WD40 or Penetrene. And a breaker bar should do the job. However if you are having trouble getting the nuts on, you need to inspect the threads. If the studs are damaged use a thread file or a needle file to clean up the damage particularly at the start of the thread. If the nuts are damaged throw them away and get some new ones. Hopefully the studs arent cross threaded.
 

NSNO_RJB

No Idea what i'm doing
Premium Member
Location
Sydney
First Name
Ronan
Drive
1998 VR4 Galant
Sorry

Problem is getting the nuts ON
Going to try and wire brush it to get rid of slme residue but if that doesn't work i think they may be crossthreaded
 

Gt_Galant

EC5A
Location
New South Wales
First Name
Fred
Drive
Galant
Oh then in that case (sorry must have read it wrong thinking you can't get them off) if getting them on is a problem - then I would replace the all the studs regardless. I changed all 10 studs on rear about a month ago.

They are not expensive.
 

NSNO_RJB

No Idea what i'm doing
Premium Member
Location
Sydney
First Name
Ronan
Drive
1998 VR4 Galant
What is involved with the replacement?
 

Gt_Galant

EC5A
Location
New South Wales
First Name
Fred
Drive
Galant
For the rears nothing special needed really.
*Just remove wheel(s),
*Undo caliper bolts (2 bolts only) and hang the caliper (obviously not by the brake line but a metal cloths hanger for example)
*Remove disc rotor.
Then behind the hub on bottom (not the top section) these a piston that adjusted the brake shoes and a spring in front of it, remove the spring because it's in the way of that piston adjuster thingy, once removed, slowly pull apart the two brake shoes just enough so that piston comes out.

Once out you'll have enough space to hammer out the old studs one by one (from bottom only) and enough space to put the new ones.

Honestly it's hard to explain but super easy to change, I did all 10 rears in about 1.5hrs (probably less) and thats without knowing what I'm doing haha, I reckon I can do it in 30minutes second time, only thing that takes time is when putting the new stud tightening it properly so it's sitting properly. But I had a impact gun so it's easy, but if you don't you just gotta use your muscles.

Here's a video that might explain it properly (abit) forward to about 3:50sec to see regarding that adjustable piston thingy.
Here:

Also note, in the video his doing the long way of taking the calipers off, it's 2 bolts that's on the hub arms and the whole thing is out with the pads still inside with a little wiggling.

And for the front to be honest I haven't really looked at them because I never needed to change them.
 

NSNO_RJB

No Idea what i'm doing
Premium Member
Location
Sydney
First Name
Ronan
Drive
1998 VR4 Galant
would imagine front are the same sort of process

ive got 1 on 3 wheels so i feel i may as well replace all of them

with some help maybe a half day job by the sounds of it
 

Baba Galant

1 AYC Bar
Lifetime Member
Location
Melbourne
First Name
John
Drive
Galant VR4 twin turbo 1997
would imagine front are the same sort of process

ive got 1 on 3 wheels so i feel i may as well replace all of them

with some help maybe a half day job by the sounds of it
Looking for a write up on the changing out the front bearing assembly, PFL.
Do you need to push the shaft way back in to get access to the 17mm bolts? Is there a need to remove the boot and cover for access?
I'd like to say, asking for a friend but I'd be lying...
 

mookers

puri puri
Location
Frankston, Melbourne, VIC
First Name
Derek
Drive
CL9 Accord Euro Lux, GE Jazz VTi, Evil Supervillain Chair, Homemade Portable Square Drumkit
Looking for a write up on the changing out the front bearing assembly, PFL.
Do you need to push the shaft way back in to get access to the 17mm bolts? Is there a need to remove the boot and cover for access?
I'd like to say, asking for a friend but I'd be lying...
The best I can do is this post with photos. I never wrote a guide for it, but I do remember it wasn't that complicated. Just a lot of the usual "dammit why won't this come free" trouble.


Baba Galant

1 AYC Bar
Lifetime Member
Location
Melbourne
First Name
John
Drive
Galant VR4 twin turbo 1997
Many thanks mookers! I figure once the 32mm nut is off I should be able to see how much movement back i get to access the 4x 17mm bolt heads.
But not washing the car when I'm done!
 

Baba Galant

1 AYC Bar
Lifetime Member
Location
Melbourne
First Name
John
Drive
Galant VR4 twin turbo 1997
Found a simple video of some kid with an Evo, once the wheel is off get someone to stomp on the brake while cracking the 32mm nut. Remove the caliper and rotor. From here you can push the drive shaft back in about 20mm which give enough room for a short 17 socket and a uni knuckle to your 3/8 ratchet. Spray the exposed threads though with some WD Specialist to let you get them through without binding due to dirt.
Most likely need a breaker bar on the ratchet to crack them (88nNM)
Once these are out it's time to look and tapping loose the hub assembly.
Mine was a pain but some tapping side to side or a slide hammer locking on 2 studs will get it out.
Prior to installing the new hub clean the inner surface with a flat scraper or blade and some WD 40
Wipe any old grease off the splines and reapply some clean bearing grease.
I also applied a slight film to the new hub prior to putting it in.
Some gentle tapping with a rubber mallet to get it in and then use the 4 bolts if necessary to pull up evenly till seated in the hub carrier. These shod be torqued up to almost 90Nm.
Rotor back on, caliper in and torqued up, insert the huge spring washer first then the 32mm nut and torque to between 190 and 240Nm depending on where the through holes line up with the castellations on the nut.
You'll need someone to hold the brake pedal down again unless you want to jam the rotor against the caliper with a big screwdriver.
I got to 205Nm and left it at that as the next alignment position was too far off.
Insert the split that's about it.
A few basic images below.

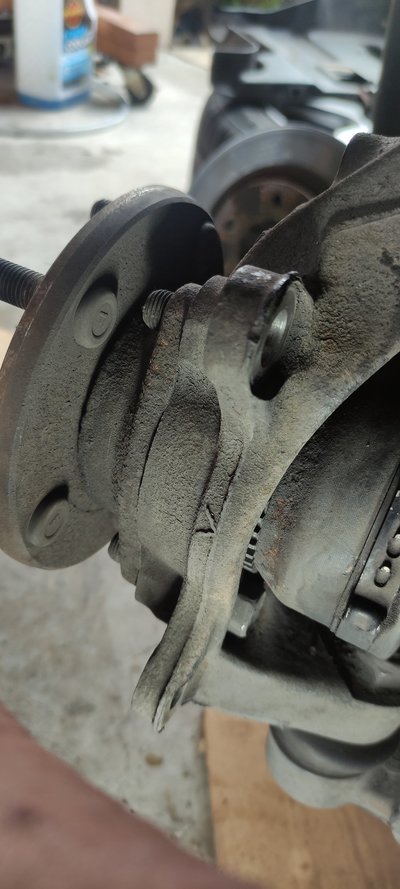
Rear view showing 1 of the 4 17mm bolts and the ABS ring attached to the shaft. All this moves back once the 32mm nut is off so you can access them.
IMG_20220204_140840.jpg
IMG_20220205_140157.jpg

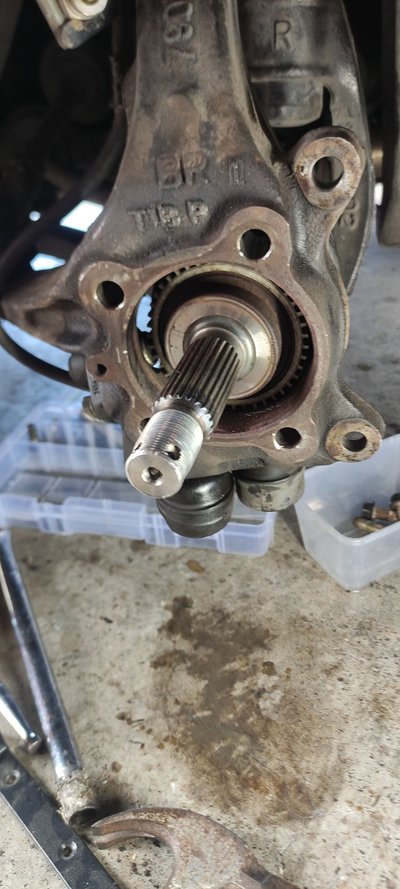
Hub carrier with shaft in place prior to cleaning and installing new hub.
 
Top Bottom