Hey Guys,
Here's what I've created, a cold air intake for the Legnum as I've searched hard for intake setups for our vehicle which I don't believe exists except a pod adapter for our cars...
So with people doing work on the exhaust and other mods, I thought I'd do the intake first being such an N/A person from Heart
Reason why I did this is a couple of reasons
1)the Current snorkel pipe that leads to the air box is quite restrictive, best way to test this is putting a piece of paper in front of the intake, and you'll hear a bit of a flutter/suction
-from there try again with the paper but on the air box itself (Snorkel removed) and ofcourse the paper dissapears
therefore; more volume of air should be achieved for this vehicle
2)Where the Snorkel sits, under the bonnet wedged, take your grill off (car runs better) and visually, you can only see 8mm gap for the induction of the snorkel
So Here's how the setup works:
From my experience of the N15 SSS days and hanging out alot with the Honda Vtec boyZZZZZZZ induction is a big thing ha
So I've taken the Evo 8's that i've seen around, with the induction through the headlight.
The pipe I've used through the headlight is a 76mm Intercooler pipe (ideal size for induction as that's what it's used for)
From there I've used just the el cheapo irrigation ribbed plastic pipe (Plastic being non heat inductive material/or sourced at Autobarn/supercheap etc)
The Ribs have been taken into consideration due to 'water' this is an advantage as water/air will never flow the way you think it would but rather it'd go and bounce everywhere so water would sit on the ribs itself and sit there. It's also ideal to slit a couple of holes here and there in the ribs for the water to drain out
Also, the Ribbed plastic pipe is not 100% butted up to the intake pipe, again, rain water has been taken into consideration especially if you were parked in a standstill water would still be able to drain out from the bottom end of the pipe
From there, the ribbed pipe just plugs straight into the air box with the snorkel removed
As for the headlight, I've chosen to drill out the high beam side, I've used a 72mm holesaw supplied by bunnings for $10 and used my blunt and worn out grinding disc on the grinder to complete the 76mm diameter (keep in mind that the circle on the headlight must be an oval shape as the finished product, because the headlight has an angle to it)
To compensate the loss of the high beam, I've set up the the 'normal driving' light to the H4 bulb as opposed to the H1 (Where one bulb can be used to do both things at once, for instance your rear park/brake light does this)
Ofcourse it's not a direct flush plug in, so with a bit of tinsnip on the edge of the bulb fitting, it fits in a treat
Now ofcourse the current plug for the bulb is short of one pin/cable for the bulb to create the high beam, this can be achieved easily by visiting to the local wreckers and search for a car with the three pin plug with three leads. Wiring is easy by pissing off the old one to hook it to the new one, and choose the active pin from the high beam plug of the existing fitting from our cars to the centre of the new pin then you're sweet!
Here's a couple of images of the build and finished product
What you need

Drill a 90mm hole at the back for a bit of extra play, this stuff is weird plastic, it's similar to the old asbestos fire proof backing boards used for switchboards, so mask is recommended
 http://ozvr4.com/forums/picture.php?albumid=27&pictureid=179
As you can see, I've drilled a perfect 72mm at front, but a black nicko was used for me to trim that extra bit off to allow the pipe to go through, blunt grinder was recommended
 http://ozvr4.com/forums/picture.php?albumid=27&pictureid=178
Result, two circle pieces
 http://ozvr4.com/forums/picture.php?albumid=27&pictureid=180
The Intercooler pipe that you can buy from Auto shops, I got this for $15
 http://ozvr4.com/forums/picture.php?albumid=27&pictureid=181
Stuff the hacksaw! It broke the blade! so just angle grinded my preffered length of pipe!
 http://ozvr4.com/forums/picture.php?albumid=27&pictureid=182
Test Fit
 http://ozvr4.com/forums/picture.php?albumid=27&pictureid=183
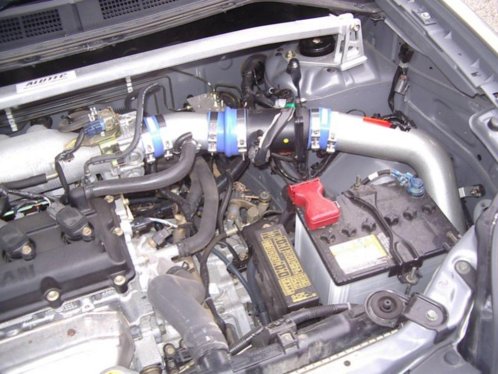
This is what it should look like, (if you have an Auto, the transmission cooler pipes would be in the way, so you must cut the pipe 'engine side' shorter to clear these)
 http://ozvr4.com/forums/picture.php?albumid=27&pictureid=184
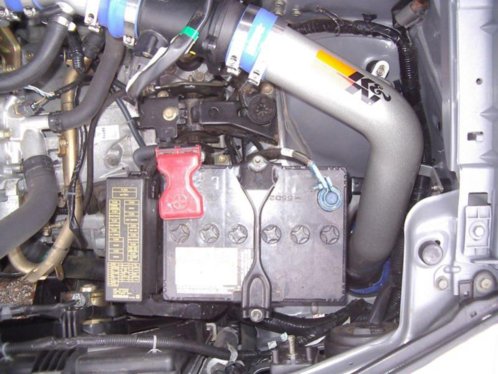
Final Product
 http://ozvr4.com/forums/picture.php?albumid=27&pictureid=185

Don't forget to use a bit of silicon around the edges of the pipe and headlight to make it waterproof!http://ozvr4.com/forums/picture.php?albumid=27&pictureid=186
 http://ozvr4.com/forums/picture.php?albumid=27&pictureid=187
So far I've notice the amount of suction through the pipe is good! and a louder plumb back blow off valve noise as well!
-Don
Here's what I've created, a cold air intake for the Legnum as I've searched hard for intake setups for our vehicle which I don't believe exists except a pod adapter for our cars...
So with people doing work on the exhaust and other mods, I thought I'd do the intake first being such an N/A person from Heart
Reason why I did this is a couple of reasons
1)the Current snorkel pipe that leads to the air box is quite restrictive, best way to test this is putting a piece of paper in front of the intake, and you'll hear a bit of a flutter/suction
-from there try again with the paper but on the air box itself (Snorkel removed) and ofcourse the paper dissapears
therefore; more volume of air should be achieved for this vehicle
2)Where the Snorkel sits, under the bonnet wedged, take your grill off (car runs better) and visually, you can only see 8mm gap for the induction of the snorkel
So Here's how the setup works:
From my experience of the N15 SSS days and hanging out alot with the Honda Vtec boyZZZZZZZ induction is a big thing ha
So I've taken the Evo 8's that i've seen around, with the induction through the headlight.
The pipe I've used through the headlight is a 76mm Intercooler pipe (ideal size for induction as that's what it's used for)
From there I've used just the el cheapo irrigation ribbed plastic pipe (Plastic being non heat inductive material/or sourced at Autobarn/supercheap etc)
The Ribs have been taken into consideration due to 'water' this is an advantage as water/air will never flow the way you think it would but rather it'd go and bounce everywhere so water would sit on the ribs itself and sit there. It's also ideal to slit a couple of holes here and there in the ribs for the water to drain out
Also, the Ribbed plastic pipe is not 100% butted up to the intake pipe, again, rain water has been taken into consideration especially if you were parked in a standstill water would still be able to drain out from the bottom end of the pipe
From there, the ribbed pipe just plugs straight into the air box with the snorkel removed
As for the headlight, I've chosen to drill out the high beam side, I've used a 72mm holesaw supplied by bunnings for $10 and used my blunt and worn out grinding disc on the grinder to complete the 76mm diameter (keep in mind that the circle on the headlight must be an oval shape as the finished product, because the headlight has an angle to it)
To compensate the loss of the high beam, I've set up the the 'normal driving' light to the H4 bulb as opposed to the H1 (Where one bulb can be used to do both things at once, for instance your rear park/brake light does this)
Ofcourse it's not a direct flush plug in, so with a bit of tinsnip on the edge of the bulb fitting, it fits in a treat
Now ofcourse the current plug for the bulb is short of one pin/cable for the bulb to create the high beam, this can be achieved easily by visiting to the local wreckers and search for a car with the three pin plug with three leads. Wiring is easy by pissing off the old one to hook it to the new one, and choose the active pin from the high beam plug of the existing fitting from our cars to the centre of the new pin then you're sweet!
Here's a couple of images of the build and finished product
What you need
Drill a 90mm hole at the back for a bit of extra play, this stuff is weird plastic, it's similar to the old asbestos fire proof backing boards used for switchboards, so mask is recommended
As you can see, I've drilled a perfect 72mm at front, but a black nicko was used for me to trim that extra bit off to allow the pipe to go through, blunt grinder was recommended
Result, two circle pieces
The Intercooler pipe that you can buy from Auto shops, I got this for $15
Stuff the hacksaw! It broke the blade! so just angle grinded my preffered length of pipe!
Test Fit
This is what it should look like, (if you have an Auto, the transmission cooler pipes would be in the way, so you must cut the pipe 'engine side' shorter to clear these)
Final Product
Don't forget to use a bit of silicon around the edges of the pipe and headlight to make it waterproof!http://ozvr4.com/forums/picture.php?albumid=27&pictureid=186
So far I've notice the amount of suction through the pipe is good! and a louder plumb back blow off valve noise as well!
-Don