Programming Keys: Difference between revisions
No edit summary |
|||
| Line 23: | Line 23: | ||
|- | |- | ||
|2 | |2 | ||
|Turn the ignition | |Turn the ignition OFF | ||
| | | | ||
|- | |- | ||
|2 | |2 | ||
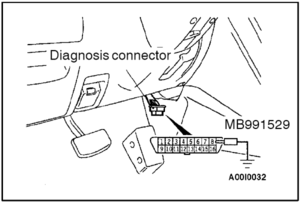
|Brige pins 1 and 4 of the diagnostic connector | |Brige pins 1 and 4 of the diagnostic connector and immediately start step 3 within 10 seconds | ||
|[[File:Diagnostic connector location.png|thumb|Diagnostic connector location|left]] | |[[File:Diagnostic connector location.png|thumb|Diagnostic connector location|left]] | ||
| Line 43: | Line 43: | ||
[[File:Diagnostic connector Pin bridging.png|thumb|Bridging pins 1 and 4 of the diagnostic connector|left]] | [[File:Diagnostic connector Pin bridging.png|thumb|Bridging pins 1 and 4 of the diagnostic connector|left]] | ||
|- | |- | ||
| | |3 | ||
|Cycle the ignition to the Accessory and then OFF 3 times | |Cycle the ignition to the Accessory and then OFF 3 times | ||
|Turn the ignition to ACC | |Turn the ignition to ACC | ||
| Line 64: | Line 56: | ||
Turn the ignition to OFF | Turn the ignition to OFF | ||
|- | |- | ||
| | |4 | ||
|Verify the doors lock and unlock | |Verify the doors lock and unlock | ||
|If you were successful in steps 1- | |If you were successful in steps 1-3, the doors will lock and unlock one time. If they do not lock and unlock, start again from step 1 until they do. | ||
|- | |- | ||
| | |5 | ||
|Press the transmitter on the key to be programmed 3 times | |Press the transmitter on the key to be programmed 3 times | ||
|On the key to be programmed to the car, press any of the buttons three times. | |On the key to be programmed to the car, press any of the buttons three times. | ||
|- | |- | ||
| | |6 | ||
|Verify the doors lock and unlock | |Verify the doors lock and unlock | ||
|If you were successful in step | |If you were successful in step 5, the doors will lock and unlock to confirm the key has been programmed. | ||
|- | |- | ||
| | |7 | ||
|Repeat step 8 for the second key (if any) | |Repeat step 8 for the second key (if any) | ||
|If you have a second key that needs to be programmed, repeat step | |If you have a second key that needs to be programmed, repeat step 5 and make sure that the doors also lock and unlock. | ||
|- | |- | ||
| | |8 | ||
|Remove the bridge from the diagnostic connector pins | |Remove the bridge from the diagnostic connector pins | ||
| | | | ||
Revision as of 10:57, 13 May 2022
Overview
The VR4 ETACS module and the associated antenna module supports up to two key remotes for unlocking and locking the doors. As discussed in the ETACS page, the security of the factory remotes is poor and does not use rolling codes or adequate encryption.
Isn't this sensitive information?
As those who work in the Information Security industry say: "Security through obscurity is no security at all". Incorrectly assuming that the factory VR4 remote key fob system is secure leads to poor choices, which in the worst case results in your car being stolen. We provide this information here for the world so that two things happen:
- You know how to program new keys to unlock your car; and
- All VR4 owners end up installing a separate immobiliser
Why keep the stock keys then?
The stock system allows you to wind up and wind down your windows remotely. It's actually a handy feature, but if you don't like the idea, then ditch the stock fobs and get an alarm with immobiliser and remote key fobs.
Key Fob programming
Screenshot from workshop manual
The following screenshot is the source of the above procedure when using the MUT. Note that use of the MUT and putting it in key programming mode automates steps 3-5 in the above table. As we do not have the MUT, the above procedure is the only method available.


