Strengthening the automatic transmission on the cheap

G

Guest

Unregistered
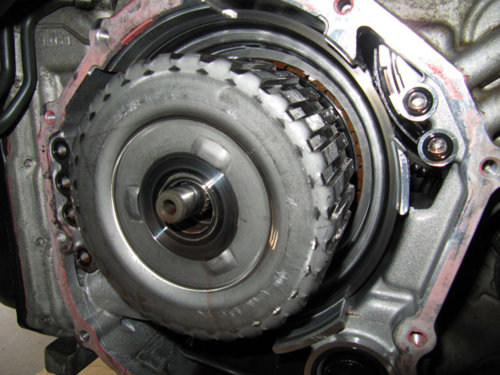
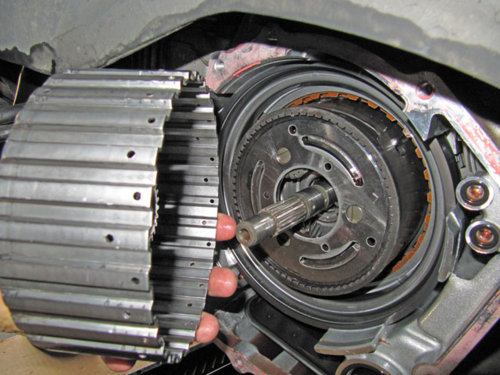
I've put about 7L in now and fired it up. Started OK, but made a tiny noise or two when first shifting out of park. Did you get that too? After that was OK. I'm hoping it was just some parts seating themselves.

I haven't had a chance to drive it yet, still need to put the brake and wheel back on.. but will test drive it later today.

I also disconnected both ends of the transmission cooling system where they meet the transmission and bled out the fluid, there's not even half a litre held in there. That's with the cooling pipes, factory cooler in the radiator and an added aftermarket transmission cooler in the system.
 
G

Guest

Unregistered
Yes when i first fired up there were a couple different noises to what you normally hear but its ok. I think it is just the air being bled out the system. I put it into drive and also reverse just to work the oil into its passages before taking it out for a drive. just go easy on the gear changes when you head out for the first time. I let it change gear when coasting rather than up shifting on acceleration. Once its gone through all gears you can do what you want
 
G

Guest

Unregistered
Guys, be sure to give Nathan a big serving of rep for his help! Kenneth's pics were invaluable too!
 
G

Guest

Unregistered
Well done! Keep up posted on how she drives wont you?

I just got back from a road test and the verdict is in..

It drives freakin' awesome!

No problems at all. I really babied it to begin with and didn't want to go too far from home.. just in case... but once everything was warmed up properly I gave it a proper testing and cruised around for a while (y)

Both Tiptronic and Auto modes drove really well, changes were smooth and positive. Tip seemed to have nice quick shifts both up & down. Given that I've done an ECU reset and changed the fluid I would expect some difference, but I have to say that I have done those before and it never drove this nicely afterward. I reckon that wave spring has been knackered since it was last cruising the streets of Japan.

I did have one moment of panic when I first engaged Drive and it didn't move.. um, forgot the handbrake was still on :oops:

So I pronounce this mission a success! :D
 
G

Guest

Unregistered
Congrats mate. Nothing like having it going afterwards to put your mind at rest. Just goes to show all those posts about such small details were worth it. I would hate to pull the trans down after getting it all back together again.
Now time for a beer
 
G

Guest

Unregistered
Yes, beer o'clock it is!

Oh, and I visited Mitsubishi this morning and picked up the genuine o-rings. Two of them came in, the other went AWOL so it's a three week back order from Japan. I told them not to worry about it! Very glad I sorted out the alternative ones now.
 

Hotwire

1 AYC Bar
Premium Member
Location
South Australia
First Name
Lee
Drive
97 COTY
Although I think there wouldn't be that many people willing to have a go at this themselves, a full writeup will be invaluable to provide to preferred workshops / auto workshops to undertake this check/replacement. Even at workshop hours of $80 per hour say, 8 hrs work + parts at around $700-800 total is much cheaper than a $3,000 rebuild!!
 

mookers

puri puri
Location
Frankston, Melbourne, VIC
First Name
Derek
Drive
CL9 Accord Euro Lux, GE Jazz VTi, Evil Supervillain Chair, Homemade Portable Square Drumkit
Definitely make a writeup that people can print out and take to their mechanics. I have done the same with the writeups for other things, and my mechanic wasn't offended or anything!
 
G

Guest

Unregistered
The other part number to add to your list is MR486686 for the valve body
 
G

Guest

Unregistered
So do you reckon there's a good chance of damaging the original gasket then? What was the price?

I just looked that up in ASA/CAPS and there is a bit of a mess, we need to figure out for sure what is going on.

Firstly it says that MR486686 is the old part number for the gasket, which has now been replaced by MN168327.

But there is a bulletin for old part number in Japanese that translates as:

Mitsubishi will cease production of part 28082 (MR486686) after 2007. However, you can fit the valve body 28000A (MR486685) with no adverse effects.

Then is gets even more confusing, there is that there is also a replacement part number for the valve body, new one being 2800A012 (also listed as 28000A).

As part of that bulletin there's also a long list of vehicles it applies too, which includes Galant & Legnum, so it's not only directed at our cars.
 
G

Guest

Unregistered
You don't always have to replace it. As sometimes your lucky and they dont tear. I was just unlucky and mine tore down near the 4 pistons.
I paid around $14nz for mine but thats because i work for mitsi and our parts manage has left to work in oz. I think normally they retail around $23 nzd. They seem to change part numbers all the time to new ones. Just make sure you check the alignment of all holes before fitting the new one. Just to be sure.
How life must be easy having a girl friend or family member that is japanese when working on jap cars.
Just for your info even here in NZ our mutt programs we have for working on jap import cars are still in jap so we memorise the steps from the english rom packs to work out what the jap ones are saying. This maybe half the reason your mitsi dealers over there sound reluctant to try find parts or work on your import cars
 
G

Guest

Unregistered
I know this is simplifying things a lot (understatement!) but I'll break the steps down later. However, do these sound correct and in the best order? Have I missed anything major? Let me know if I should swap anything around or add something.

DISASSEMBLY
1. remove left-hand/passenger side wheel
2. remove brake caliper & disc (optional)
3. remove undertray
4. remove wheel-arch lining (optional)
5. remove inner splash shield
6. remove battery & tray (optional)
7. drain ATF
8. drain coolant
9. remove radiator
10. remove left-hand/passenger side fan
11. remove passenger side hard intercooler piping & BOV
12. remove transmission rear cover
13. remove all internal components on input shaft until wave spring is reached.
14. remove second brake retainer seal

REASSEMBLY

1. replace wave spring with solid, one-piece design
2. reinstall all internal components onto input shaft
3. remove valve body cover
4. remove valve body & gasket
5. install second brake retainer seal
6. reinstall valve body & gasket
7. reinstall valve body cover
8. replace rear cover o-ring seals
9. reinstall transmission rear cover
10. reinstall passenger side intercooler hard piping & BOV
11. reinstall left-hand/passenger side fan
12. reinstall radiator
13. reinstall battery & tray (optional)
14. reinstall inner splash shield
15. reinstall wheel-arch lining (optional)
16. reinstall undertray
17. reinstall brake caliper & disc (optional)
18. reinstall left-hand/passenger side wheel
19. refill ATF
20. refill coolant
 
G

Guest

Unregistered
Sounds ok just maybe put an optional next to brake caliper and disk as well wheel arch lining
 
G

Guest

Unregistered
You're right, will do. They don't need to come off unless you'd prefer to have a little bit more space to work in, but no they don't really obstruct access to the transmission.
 
G

Guest

Unregistered
Unfortunately I don't think I have a picture looking inside that, but here is what I could find.

The planetary reverse sun gear is a single unit. Both the inner and outer sections show as a single part number in ASA/CAPS. Perhaps the gear inside is affixed in some way that can come loose? I don't remember there being any pins or easy way to disassemble it further, but I also wasn't looking for any more work than was necessary.

If anyone knows more or has a photo looking inside please post it up here.
 

Attachments

  • reverse-sun1.jpg
    reverse-sun1.jpg
    83.3 KB · Views: 499
  • reverse-sun2.jpg
    reverse-sun2.jpg
    83.7 KB · Views: 498
G

Guest

Unregistered
This one had me a bit stumped, but much measuring with the calipers indicates that the larger o-ring seal MD756673 on the clutch accumulator should be: 37.7mm ID x 3.5mm C/S

That also happens to be a standard Japanese size. The reason I couldn't figure it out is that ASA/CAPS is giving some misleading data that I don't believe can be correct.

I do have a new genuine seal on order and will check that out when it arrives, but I'm also going to purchase some aftermarket ones tomorrow as per my above measurements and check them for suitability.

A genuine o-ring seal MD756673 turned up today. It looked to be a very slightly larger diameter and a little thinner than my old one that came out. But it's hard to tell because the old one was a bit distorted.

Measuring it up, I can't find an aftermarket equivalent in the Japanese sizing charts so I'll stick with my previous recommendation which was a close match and fitted well when I put into my own box. I did measure the recess in the gearbox housing too, in order to confirm the suitability of the aftermarket item.
 

legnum600

Leaving Skid Marks
Location
Au
First Name
jason s
Drive
2000 legnum
Yeah the three locking screws when you take the cover off were tig welded, as you can see in your last pic.
 
G

Guest

Unregistered
Ah, what you called the cover is actually referred to in the manual as the 'planetary reverse sun gear'. The thing underneath with the screws is the 'planetary carrier assembly', and it has three gears that mesh into another gear that's on the inside of the sun gear (you can just see it peeking out).

The manual shows that on older models of the transmission this carrier comes apart, but then on newer versions it just removes as one complete unit. The section that contains the gears is welded together from the factory, that's those three semi-circular arcs you can see between the screws. If the screws came loose then I can see it might cause a problem with the gears.

Thanks for the heads up, anyone else taking their box apart should at least check those screws to make sure they haven't loosened.

EDIT: Thinking back.. I was examining the parts on the bench one day and did check those screws for tightness and they were done up OK.
 
Top Bottom